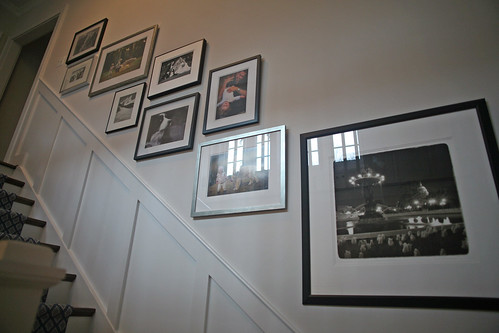
Monday, December 19, 2011

Christmas Decor

I spent a lot of time decorating our home for our first holiday season here. We had a big party on the 10th and I wanted everything looking festive by then. So without further ado, here are some pictures of our holiday decor.

Our Entryway:

12 07_1688_edited-1

The details: The red rosette wreath is from Smith & Hawken for Target. I tied that along with the two stars from JoAnn Fabrics with burlap, also purchased from JoAnn, and hung them from the staircase. I accented with the red rosette tree, also from Target and a mercury tree from Home Goods. I also threw in the little reindeer from Pottery Barn from a few years ago. I filled my apothecary jars (one from Crate & Barrel and two from Home Goods) with candy canes, hershey peppermint kisses and small ornaments from Michael's and Target:

12 07_1703_edited-1

Dining Room:

12 07_1691_edited-1

12 07_1692_edited-1

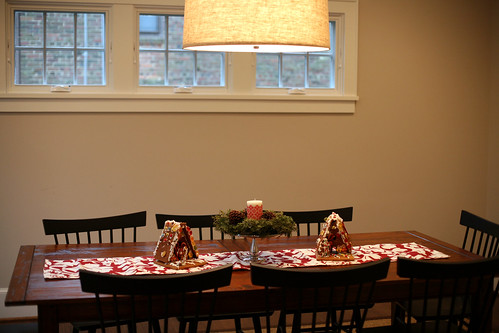
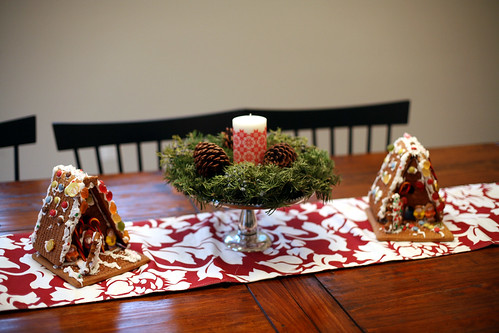
I kept it simple in the dining room, with a runner from Home Goods (I think it's Badgley Mishka) and a pedestal from Home Goods with a wreath from Home Depot and candle from Ikea. The girls made the gingerbread houses with my mom from Trader Joe's kits.

Living Room:

12 07_1680_edited-1

Our mantle is decorated with our stockings for the whole family from Pottery Barn Kids that I bought several years ago. I used some berry garland from World Market from a couple of years ago, Nutcrackers (I think from World Market) and a little vase with some accessories from Michael's.

I added a few details to the shelves in our living room:

12 07_1686_edited-1

Since the original larger pictures went on the staircase wall, I moved in a few new pictures and that ginormous clock from Home Goods. I had originally bought it for the entry way, but SOMEONE wasn't a big fan. But we compromised and put it there and it fills some space. The silver deer adds a little festive touch and we threw in the menorah for good measure..

In the family room, I didn't do much. A little details just makes the room more festive. Oh and the Christmas Tree-I suppose I should take a picture of it!

12 07_1679_edited-1

12 07_1677_edited-1

It feels very holiday in our house without being totally overwhelming (I think!). And now I have tons of items to decorate with next year and probably won't have to do much shopping next year. (Yeah right ;) )...

Thursday, December 1, 2011

Stairway Transformation

When we were building the house, I loved the idea that the first and major thing you would see when you walked in our front door was our stairway. Not the messy living room or the cluttered kitchen. Not the dining table covered with mail and other junk. Nope..you'd see a stairway--something that inherently can't be THAT messy. What I didn't realize is how giant our entry wall would be. Sure, there's a small wall right in front of you, but behind it, there's a giant two story wall.

Like this. See?

around the house_07 23_2814_edited-1

Literally, this is exactly what you saw when you came in:

around the house_07 23_2813_edited-1

So I started envisioning. I looked on Pinterest and imagined that I would cover the wall with frames from floor to ceiling..sort of a la Young House Love. The other half nixed that quickly-"too much clutter". Why the hell do they have to have opinions??

So we decided together that some stair runner and some trim would help to make our case-help to cut up the space a little and make it more warm and inviting. I mentioned the stair runner a while ago. Well, this is what we picked:

11 30_0942_edited-1

And then we decided on some board and batten trim work on the wall to cut it up a bit:

11 30_0943_edited-1

Then, we compromised and did the photos on the wall. I got my different color frames and not all personal photos. And he got his "not all the way to the ceiling"...

11 30_0936_edited-1

11 30_0934_edited-1

11 30_0932_edited-1

And you know what? I love it! The stairs make me happy-and how often can you say that!?!

PS. I know you see our greenery in the last picture-but holiday decorating is a whole 'nother post!

Linking to Transformation Thursday at Shabby Creek

Sunday, November 20, 2011

Sunday, November 13, 2011

Make Your Own Art

Here's where I reveal the art I made for Zoe's room.

I couldn't find one last print for the space above her bed. No more owl prints or other cute things to be had at Home Goods. I thought about doing some unpaintings (fabric stretched over canvas) but couldn't find the right fabrics. So I just bought some canvases at Michael's and went to town.

I bought three 16x20 canvases. First I painted them solid colors-2 pink and one purple:


Then I used a Martha Stewart stencil I found, also at Michael's:


What, you say? You think I should do something about the hair on my arms? Just kidding, that's the other half who lent me his thumbs for the final canvas. When all was said and done, they looked like this in my kitchen:


And this is what they look like in Zoe's room...

RANDOM_10 24_0249_edited-1

That's along with the last owl print I found at Home Goods. I may have stalked the woman who had the other one in the set for a little while in Home Goods to make sure she didn't decide against it. But then I chortled to myself that I actually got the cuter one and let her have the ugly one.

RANDOM_10 24_0250_edited-1

And that's me, crafty lady, signing off.

Sunday, November 6, 2011

Runner, Runner on the Stair.

If I told you that we were getting a runner on our stairs for our 11 year old Golden Retriever, would you think I was crazy? You would. Well, it's a good thing that's not the case...

We decided to get a runner for our stairs for several reasons. First of all (and these are in no particular order), the staircase just seems kind of cold and uninviting. So in my efforts to warm it up and make it more homey, I thought a runner would add a little color and texture. Secondly, the idea of kids running up and down hard wood stairs makes me nervous-especially with socks on. Thirdly, with the dark stain, I'll do anything to protect the wood..even if it means covering it. Lastly, there's the issue of the elderly Golden Retriever.

I knew I didn't want some run of the mill boring colored carpet, so I set out to the carpet store with the idea of stripes in mind. Well, not so much to pick from. If I wanted a neutral khaki carpet, I would have been in luck. I also didn't want to break the bank on this idea, so I wasn't going to be going to the Design Center or going crazy with some custom carpet. I did manage to find something at our flooring place--it was the same place that the builder used for the carpet in our basement, so I knew the vendors and installers would do a quality job.

I came home with three boards of carpet to consider. The other half and I looked at them long and hard and changed our minds several times. Then we had several people come the next day to take a look at the choices. Among the friends, the pick was unanimous. Since we were already leaning in that direction, we went with it. Here is a pic of the samples..do you think you know which it is?? The answer, and the installation revealed, later this week!

RANDOM_10 17_0281_edited-1

Wednesday, November 2, 2011

The one where I like the rug...

When we were picking paint colors for this house, I knew one room would be pink. But I didn't want TWO of them. So I decided that for Zoe I would do purple. I was a little worried about the shade, but then I tried to pick a color that was more in the blue family-sort of like a hydrangea. I lucked out and picked a great color.

05 18_2430_edited-1

Of course, you can't really tell in that picture because of the light--but i swear it's pretty.

Then I saw this picture and really loved the coloring of the room-and the walls we have are almost the exact same color...


So I set about to give our room a similar feel. Problem: a lack of designer budget or patience. So I had to give. But with a lot of help from Home Goods and Pottery Barn Kids, this is where we ended up:

RANDOM_10 17_0262_edited-1

The lamp was an awesome find from Home Goods-I think I found it the weekend we moved into the house. Owl Prints? Home Goods, about a month ago. The chest of drawers is from Land of Nod--about 5 years old from Maya's original nursery. See that picture of the Golden Retriever? Peter painted that before Maya was born..cute, no?

RANDOM_10 17_0260_edited-1

Had to have the same Pottery Barn Kids chandelier that Maya has..it's so adorable and I feel like it makes the room. The curtains, on the other hand, were a disappointment. Kind of like the rug in Maya's room-but they came from a place of necessity. If you have encountered a child who wakes up at the first crack of light in the morning, you know what I am talking about. Get me those black out shades ASAP in whatever you have in stock!

The rug is from Pottery Barn kids and we bought it when we bought the big girl bed..about 2 months ago. This time, the child has less influence and Mommy got to choose. So. Much. Better!!

RANDOM_10 17_0263_edited-1

RANDOM_10 17_0265_edited-1

Found that cute picture at...yes, you guessed it..Home Goods. The chair was the original chair from Maya's nursery. On my list of things to do is to get a new slipcover for it..but given all the things we have to purchase for the house, it's really low on the totem pole. Or I might just sell the chair and get a new, less expensive one in a color I like.

Wait, you want to see the bed? But then that would spoil the piece of DIY art that I made that I am saving for another post! So stay tuned ;)

Thursday, October 27, 2011

A rug can make all the difference...

Warning. This is not one of those inspiring posts where I show you a drab room and then throw in a great rug and it makes all the difference and Voila! A perfect room. Nope, quite the opposite actually...

This is the story of what happens when your husband takes your 4 year old to go pick out a rug as a "bonding activity" while you are taking your younger daughter to a gym class. This is what happens when your daughter picks the ugliest rug in Pottery Barn Kids and then gets totally attached to it, so when your husband says, "You can return it!", you know you really can't without being the horrible witch of a mother who would rather have a pretty room than a happy child.

That being said, I finally finished putting together Maya's room. In a way, the rug freed me. I didn't have to obsess over every decorative accent-the room was never going to be one of this hip and stylish little girl's rooms you see on Pinterest. Nope, it was going to be your average 5 year old girl room.

We painted the room the same color that she had in her room in the old house. Pink.


Then we filled it with all of Maya's furniture, toys and treasures (ie. crap). How many doo dads and thingamagiggys can a 5 year old have? A LOT... So now it looks like this:

RANDOM_10 17_0259_edited-1

See the ugly rug??

In Maya's old room, I filled the largest wall with a collection of picture frames of her and her friends and family. I wasn't sold on doing it again, so I figured I'd just get some girly prints--I scored big at Home Goods one day:

RANDOM_10 17_0257_edited-1

RANDOM_10 17_0256_edited-1

I took the letters that were above Maya's bed in the old room and put them on their own wall, so they could be more featured:

RANDOM_10 17_0254_edited-1

And then found some sticky mirror butterflies at Home Goods that were about $6..

RANDOM_10 17_0255_edited-1

And that there is the girliest room you'll find. And you know what? She loves it. So I guess that's all that matters...right??

Tuesday, October 25, 2011

Halloween Decor

I can't say that in the past we've ever done that much Halloween decor, but after seeing our kid's fascination with our neighbor's big blow up pumpkin on their front yard, I decided to head to the store to do up our outside...

First I went to Target. That was a BUST. Second week of October and almost all of the Halloween decorations were gone and they were making room for Christmas stuff. Say what?

Next stop, Party City. MUCH better. I managed to score a ginormous spider, a bunch of webbing and some Halloween pumpkin lights.

10 25_0310_edited-1

10 25_0306_edited-1

But that wasn't enough-I needed some crows. Couldn't find any at AC Moore, but I did find a cute Trick or Treat sign--the candy corn sold me, since I have two big candy corn fans in the house.

And finally, at Michael's, I found crows...and they had some sparkle, just to make them even more attractive.

10 25_0303_edited-1

Of course, Maya and Zoe couldn't resist the fun decorations at the bird store in the local shopping center, so we got one of those too:

10 25_0312_edited-1

How much dorkiness would I reveal if I said I was tempted to get one for every holiday? ;)

So, here is the whole picture...I don't think we went overboard, do you?

10 25_0306_edited-1

Monday, October 24, 2011

My first encounter with spray paint.

Spray painting is all over the blogosphere. Amy spray painted this cool mirror. Sherry spray painted her outdoor furniture. And Melissa did a lamp.

So I decided that I could do this. How hard can it be to yield a bottle of spray paint and transform something completely?? Well, it's not that hard. But I definitely lost more than a few brain cells.

We bought some gorgeous mums when we went apple picking and I really wanted to decorate our front walk with them. However, the plastic planters that they came in just weren't cutting it. I looked around for some cool planters that had a modern twist but were simple, but couldn't find anything--October, as it turns out, is a hard time of year to look for outdoor decorating stuff!

So I decided to tackle my first spray painting project. I picked up some of those basic terracotta planters you find in any gardening section-I got them at Home Depot. While at Home Depot, I picked up a bottle of spray paint--the color was called Oil Rubbed Bronze. I liked the fact that it had some metallic sheen to it.

I decided that I wanted to do the project in our garage. Why, you might ask, did I decide to spray violently toxic fumes in an enclosed space? Oh, just figured I'd avoid the breeze outside. So I went to task:

Before:


I sprayed the hell out of those mofos. And let me tell you, after about 5 minutes of spraying I got the stomach and head ache from HELL. I had NO idea why I felt like that, but I was almost doubled over. I sprayed the rest of them and walked out into the fresh air and started to feel better almost instantly..but they looked good!


I let them dry overnight and came back in the morning to replant the mums into them. Who knew that the mums were in a much wider planter than these? Not me...but I made it work. I put them up on our front walk and I think they look pretty nice, if I say so myself.

RANDOM_10 17_0276_edited-1

10 25_0304_edited-1

So go on...go buy yourself a can of spray paint today!

Sunday, October 9, 2011

Small Details.

Well, maybe bathroom mirrors aren't small details. In fact, after living without a bathroom mirror for 4 months, I am pretty sure they aren't!

We had a small glitch with bathroom mirrors. Originally, the builder had specified for one sconce above the mirror in the master bath--we have two matching vanities on opposite sides of the bathroom-quite possibly the best invention ever for a product hog (and by that, I mean my husband). In any case, we had our heart set on sconces that would go on each side of the mirror. Unfortunately, the builder had already installed the electrical for the single sconce. Not a real problem, he said, he would cap it off and install the new electrical and we could just get a mirror that was large enough to cover the cap. Well, that meant that we had to find a mirror with dimensions of 30"x40". That's a big mirror.

We finally found one at Restoration Hardware. And it was backordered. And backordered some more. And finally, on September 20-something it arrived on our front step (or garage, but these are small details). We were ambitious and thought we could install them ourselves. No dice-these suckers are not only huge but ridiculously heavy and the last thing you want in a bathroom is no mirror AND a huge hole in your wall. So we enlisted the help of one of our builder's men. Thank goodness. And now for the big reveal...

BEFORE:

33 - Trenton

Master Bath Vanity

AFTER:
(Excuse the bad lighting)

Blog_10 08_0239_edited-1

Blog_10 08_0240_edited-2

Blog_10 08_0237_edited-1